
Meralgia paresthetica is a condition characterized by tingling, numbness, and pain in the outer thigh, caused by compression of the lateral femoral cutaneous nerve. While medical interventions are available, physical therapy exercises can play a pivotal role in managing symptoms and improving overall well-being.
In this blog post, we will explore some of the most effective physical therapy exercises for individuals dealing with meralgia paresthetica.
Physical Therapy Exercises for Meralgia Paresthetica
1. Standing Quadriceps Stretch
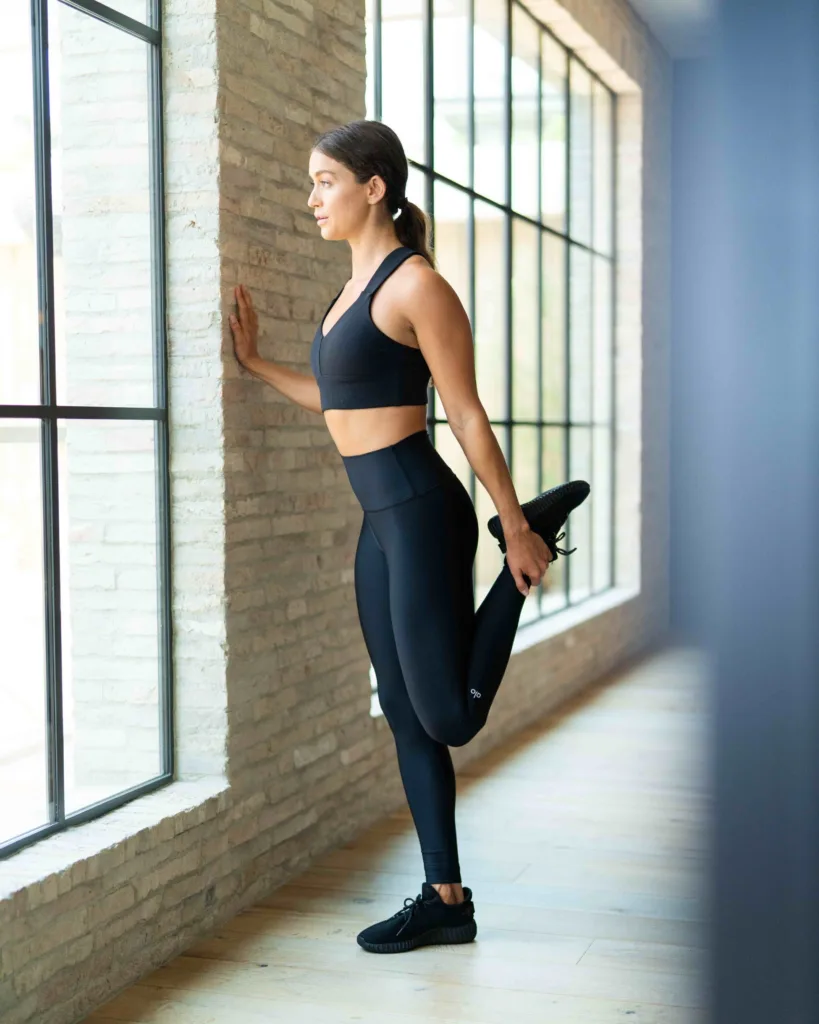
- Start Position:
- Stand up straight with your feet hip-width apart.
- Use a chair or a wall for balance if needed.
- Lift One Leg:
- Shift your weight onto your right leg.
- Bend your left knee, bringing your heel toward your buttocks.
- Grasp Your Ankle:
- Reach back with your left hand and grasp your left ankle. If you have difficulty reaching, you can use a towel or strap to loop around your ankle for assistance.
- Maintain Posture:
- Keep your knees close together and your standing leg slightly bent to maintain balance.
- Engage your core muscles to stabilize your spine.
- Feel the Stretch:
- Gently pull your left ankle towards your buttocks, feeling a stretch along the front of your left thigh (quadriceps).
- Hold the stretch for 15-30 seconds. You should feel tension, but not pain.
- Switch Legs:
- Release the stretch and switch to the other leg.
- Repeat the process, bending your right knee and bringing your right heel toward your buttocks, holding for 15-30 seconds.
- Repeat:
- Perform 2-3 sets on each leg.
Tips:
- Ensure that your knees stay close together during the stretch to target the quadriceps effectively.
- Focus on maintaining good posture throughout the stretch, avoiding leaning forward or backward.
- Perform the stretch in a controlled and slow manner, avoiding sudden movements.
2. Clamshell Exercise

The Clamshell exercise is a targeted movement that focuses on strengthening the muscles around the hips, particularly the gluteus medius. This exercise is often recommended by physical therapists to address issues such as hip pain, instability, and certain lower back problems. The Clamshell is simple to perform, making it accessible to individuals at various fitness levels. Here’s a step-by-step guide on how to do the Clamshell exercise:
- Starting Position:
- Lie on your side on a mat or another comfortable surface.
- Ensure your body is in a straight line from head to toe.
- Prop yourself up on your elbow, keeping your forearm perpendicular to your body.
- Leg Position:
- Bend your knees to approximately a 45-degree angle, stacking your hips and shoulders.
- Keep your feet together throughout the exercise.
- Execution:
- While maintaining the position of your feet and without moving your lower back, lift your top knee as high as you comfortably can.
- Open your legs, resembling the movement of a clamshell.
- Hold the open position for a moment to engage the glute muscles.
- Return to Starting Position:
- Slowly lower your top knee back down to meet the bottom knee.
- Ensure a controlled movement throughout the exercise to maximize its effectiveness.
- Repetitions:
- Aim for 10-15 repetitions on one side before switching to the other side.
- Perform 2-3 sets on each side, depending on your fitness level.
Tips for Proper Form:
- Focus on isolating the movement to your hips, avoiding any rotation of your pelvis or torso.
- Keep your core engaged to stabilize your spine during the exercise.
- Maintain a steady pace, emphasizing control over speed.
3. Glute Bridge

The glute bridge is a highly effective exercise that targets the gluteal muscles, hamstrings, and lower back. It’s a versatile movement suitable for individuals of various fitness levels and can be performed virtually anywhere with no need for special equipment. Here’s a step-by-step guide on how to do the glute bridge exercise correctly:
How to Perform the Glute Bridge:
- Starting Position:
- Lie on your back on a comfortable exercise mat or the floor.
- Bend your knees and place your feet flat on the ground, hip-width apart.
- Keep your arms relaxed at your sides, with your palms facing down.
- Setting Up Your Body:
- Ensure your feet are directly under your knees.
- Activate your core muscles by gently drawing your navel toward your spine.
- Keep your spine in a neutral position, with a natural curve in your lower back.
- Executing the Bridge:
- Press through your heels and squeeze your glutes as you lift your hips towards the ceiling.
- Aim to create a straight line from your shoulders to your knees at the top of the movement.
- Avoid arching your lower back excessively; focus on engaging your glutes to lift your hips.
- Ensure your knees stay in line with your feet and do not collapse inward.
- Top Position:
- Hold the bridge position at the top for a moment, emphasizing the contraction in your glutes and hamstrings.
- Keep your core engaged to maintain stability.
- Lowering Down:
- Slowly lower your hips back down to the starting position, articulating through your spine.
- Aim for controlled movement, avoiding abrupt drops.
- Repetition:
- Perform 2-3 sets of 10-15 repetitions, adjusting the number based on your fitness level and goals.
Muscles Targeted:
- Gluteus maximus
- Hamstrings
- Lower back muscles
- Core muscles
Tips for a Successful Glute Bridge:
- Focus on the Glutes:
- Concentrate on contracting your glutes throughout the movement to ensure they are the primary muscles engaged.
- Maintain Core Engagement:
- Keep your core muscles activated to stabilize your spine and protect your lower back.
- Control the Movement:
- Perform the glute bridge with controlled, deliberate movements, emphasizing quality over quantity.
- Breathing:
- Inhale as you prepare for the movement, and exhale as you lift your hips.
- Inhale again at the top of the movement and exhale as you lower back down.
- Modify for Difficulty:
- To increase difficulty, consider extending one leg straight while keeping the other bent during the bridge.
- For added challenge, use an exercise ball placed under your feet.
4. Iliopsoas Stretch (Split Stance) Exercise

The iliopsoas muscle, often referred to as the hip flexor, plays a crucial role in hip mobility and is commonly tight due to prolonged periods of sitting. Stretching the iliopsoas can help alleviate tightness, improve flexibility, and prevent discomfort. The split stance iliopsoas stretch is an effective exercise to target this muscle. Here’s a step-by-step guide:
Split Stance Iliopsoas Stretch:
- Starting Position:
- Begin in a standing position with your feet hip-width apart.
- Take a step forward with your right foot, creating a comfortable distance between your feet.
- Ensure that your feet are parallel, and your toes are pointing forward.
- Lunge Forward:
- Lower your body into a lunge by bending your right knee while keeping your left leg straight.
- Keep your torso upright, engaging your core to maintain balance.
- Distribute your weight evenly between both legs.
- Tilt Pelvis Backward:
- As you lunge forward, focus on tilting your pelvis backward.
- This movement intensifies the stretch on the left side of your hip, targeting the iliopsoas muscle.
- Hold the Stretch:
- Hold the stretch for 15-30 seconds, feeling a gentle but effective stretch in the front of your left hip.
- Be mindful not to arch your lower back excessively; instead, maintain a slight posterior pelvic tilt to emphasize the stretch on the iliopsoas.
- Switch Legs:
- Return to the starting position and switch to the left leg forward.
- Repeat the stretch on the right hip, maintaining proper form and balance.
- Repeat:
- Perform 2-3 sets of 2 stretches on each leg.
- Gradually increase the duration of the stretch as your flexibility improves.
Tips for an Effective Iliopsoas Stretch:
- Gentle Progression: Start with a small lunge and gradually increase the depth as your flexibility improves.
- Maintain Alignment: Keep your torso upright and ensure that your front knee is directly above your ankle to prevent unnecessary strain on the knee joint.
- Consistency is Key: Perform this stretch regularly, especially if you have a sedentary lifestyle or engage in activities that involve prolonged sitting.
- Listen to Your Body: If you feel any pain (not to be confused with a gentle stretch), ease off the stretch and consult with a healthcare professional if necessary.
5. Iliopsoas Stretch (Deep Split Stance) Exercise
The iliopsoas stretch in a deep split stance is a targeted exercise that focuses on stretching and lengthening the iliopsoas muscle, a key hip flexor. This muscle plays a crucial role in hip and leg movement and can often become tight or shortened, leading to discomfort or restricted mobility. Performing the deep split stance iliopsoas stretch can help alleviate tension in this muscle. Here’s a step-by-step guide:
- Starting Position:
- Begin in a standing position with your feet hip-width apart.
- Take a step forward with your right foot, ensuring it is a comfortable distance from the left foot.
- Both feet should be pointing forward.
- Deep Lunge:
- Bend your right knee, lowering your body into a deep lunge. Ensure that your right knee is directly above your ankle and your left leg is extended straight behind you.
- Keep your back leg straight, with the toes pointing slightly outward.
- Pelvic Tilt:
- Tilt your pelvis backward, bringing your hips slightly forward. This movement intensifies the stretch along the front of your left hip and thigh.
- Reach and Extend:
- To deepen the stretch, reach your arms overhead, keeping them straight.
- Engage your core to maintain stability during the stretch.
- Hold the Stretch:
- Hold the stretch for 15-30 seconds, feeling a gentle pull in the front of your left hip and thigh.
- Focus on breathing deeply and relax into the stretch.
- Switch Sides:
- Slowly return to the starting position and switch to the other side.
- Repeat the entire sequence with your left foot forward and your right leg extended behind you.
Tips for a Safe and Effective Stretch:
- Ensure your movements are controlled and gradual to avoid overstretching.
- Keep your torso upright and avoid leaning excessively forward.
- Engage your core muscles to stabilize your spine.
- Listen to your body, and if you feel any pain (other than a mild stretch), ease out of the position.
Benefits of Physical Therapy Exercises for Meralgia Paresthetica
- Reduced Nerve Compression:
- Pelvic tilts and lumbar rotation exercises help improve the alignment of the spine and reduce pressure on the lateral femoral cutaneous nerve, alleviating symptoms of meralgia paresthetica.
- Improved Core Strength:
- Pelvic tilts engage the core muscles, providing stability to the pelvis and lower back. Strengthening the core contributes to better overall posture and reduced strain on the affected nerve.
- Enhanced Hip Stability:
- Hip abduction exercises target the muscles around the hip, improving stability and reducing tension on the lateral femoral cutaneous nerve. This helps minimize the impact of nerve compression.
- Increased Flexibility:
- Seated stretching and lumbar rotation exercises promote flexibility in the lower back, hip, and thigh muscles. Improved flexibility reduces stiffness, enhances range of motion, and mitigates discomfort associated with meralgia paresthetica.
- Muscle Strengthening for Lower Limb Support:
- Quad and hamstring strengthening exercises indirectly benefit meralgia paresthetica by promoting proper mechanics in the lower limbs. Stronger leg muscles provide better support and reduce stress on the affected nerve.
- Pain Relief and Symptom Management:
- The combined effects of these exercises contribute to pain relief by addressing the root causes of meralgia paresthetica. Strengthening, stretching, and stabilizing key muscle groups help manage and reduce symptoms over time.
- Improved Functional Mobility:
- Strengthening exercises, particularly those targeting the hip and lower limb muscles, enhance overall functional mobility. This is especially important for individuals with meralgia paresthetica, as improved mobility positively impacts daily activities.
- Proactive Management:
- Engaging in a consistent physical therapy routine empowers individuals to take an active role in managing their condition. Regular exercise promotes self-efficacy and a sense of control over symptoms, fostering a proactive approach to overall well-being.
- Adaptable to Individual Needs:
- These exercises can be tailored to individual fitness levels and adjusted based on the severity of meralgia paresthetica symptoms. This adaptability ensures that individuals can progress at their own pace, minimizing the risk of overexertion.
- Long-term Health Benefits:
- Consistent engagement in these physical therapy exercises not only provides relief from current symptoms but also contributes to long-term health. Strengthening and stretching key muscle groups support ongoing spinal health and reduce the likelihood of future issues.
In conclusion, the benefits of incorporating these physical therapy exercises into a routine for meralgia paresthetica extend beyond symptom management. They promote overall musculoskeletal health, improve mobility, and empower individuals to actively participate in their well-being. It’s essential to approach these exercises with diligence and under the guidance of healthcare professionals to ensure a safe and effective rehabilitation process.


Pingback: मेराल्जिया पेरेस्टेटिका के लिए व्यायाम - meralgia paresthetica exercises in hindi