
Baastrup’s Disease, also known as “kissing spine syndrome,” occurs when adjacent spinous processes in the spine make contact, leading to pain and discomfort. This condition can significantly impact an individual’s quality of life, affecting their ability to perform daily activities.
Fortunately, physiotherapy has emerged as a valuable tool in managing and alleviating the symptoms of Baastrup’s Disease. In this comprehensive guide, we will explore the best physiotherapy exercises for Baastrup’s disease, which is designed to bring relief and promote healing.
Understanding Baastrup’s Disease:
Before delving into the exercises, it’s crucial to have a basic understanding of Baastrup’s Disease. This condition typically arises in the lumbar spine, where the spinous processes are designed to have a certain amount of space between them. When these processes come into contact due to degeneration, poor posture, or other factors, it leads to pain, inflammation, and stiffness.
Physiotherapy for Baastrup’s Disease:
Physiotherapy plays a pivotal role in managing Baastrup’s Disease by focusing on strengthening the core, improving flexibility, and promoting proper spinal alignment. Here are some of the best physiotherapy exercises tailored to address the specific needs of individuals with Baastrup’s Disease:
Best Baastrup’s Disease Exercises
1. Cat-cow stretch exercise
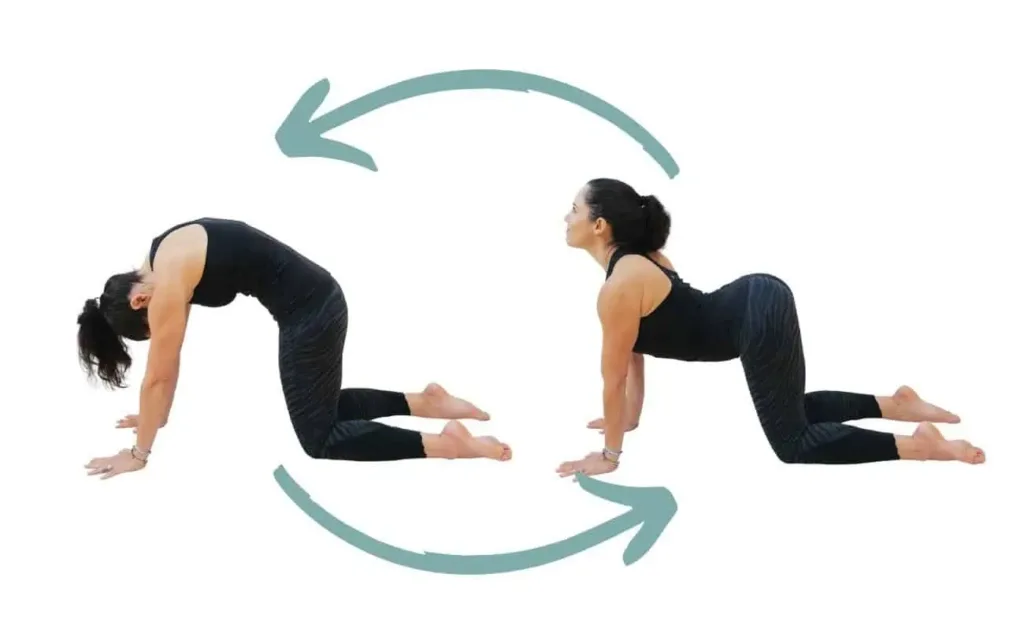
The cat-cow stretch is a yoga-inspired exercise that helps improve flexibility and mobility in the spine. It’s a gentle and effective movement that can be particularly beneficial for conditions like Baastrup’s Disease. Here’s a step-by-step guide on how to perform the cat-cow stretch:
Step 1: Starting Position – Tabletop Position
- Begin on your hands and knees in a tabletop position. Ensure that your wrists are directly under your shoulders and your knees are under your hips.
- Spread your fingers wide for stability and press your palms firmly into the mat.
Step 2: Cow Pose (Extension)
- Inhale as you drop your belly towards the mat, arching your back.
- Lift your chest and gaze forward, allowing your spine to curve gently. This is the “cow” part of the stretch.
Step 3: Cat Pose (Flexion)
- Exhale as you round your spine toward the ceiling, tucking your chin to your chest.
- Engage your abdominal muscles, feeling a stretch along your back. This is the “cat” part of the stretch.
Step 4: Flowing Movement
- Continue to move between the cow and cat poses in a flowing motion.
- Inhale for cow pose, extending the spine.
- Exhale for cat pose, flexing the spine.
- Move at a pace that feels comfortable for you, coordinating the movement with your breath.
Step 5: Repetition
- Repeat the cat-cow stretch for about 1-2 minutes, gradually increasing the fluidity of the movement.
- Focus on the sensations in your spine, aiming to increase the range of motion with each repetition.
Tips:
- Pay attention to your breath: Inhale deeply as you arch into the cow pose and exhale fully as you round into the cat pose.
- Customize the movement: If you have any discomfort or pain, modify the range of motion to a level that feels comfortable for your body.
Benefits:
- Spinal Flexibility: The cat-cow stretch encourages movement throughout the entire spine, promoting flexibility and preventing stiffness.
- Abdominal Engagement: The engagement of the abdominal muscles during the cat pose helps strengthen the core.
- Improved Posture: Regular practice of this stretch can contribute to better posture by addressing issues related to spinal alignment.
2. Bird dog exercise
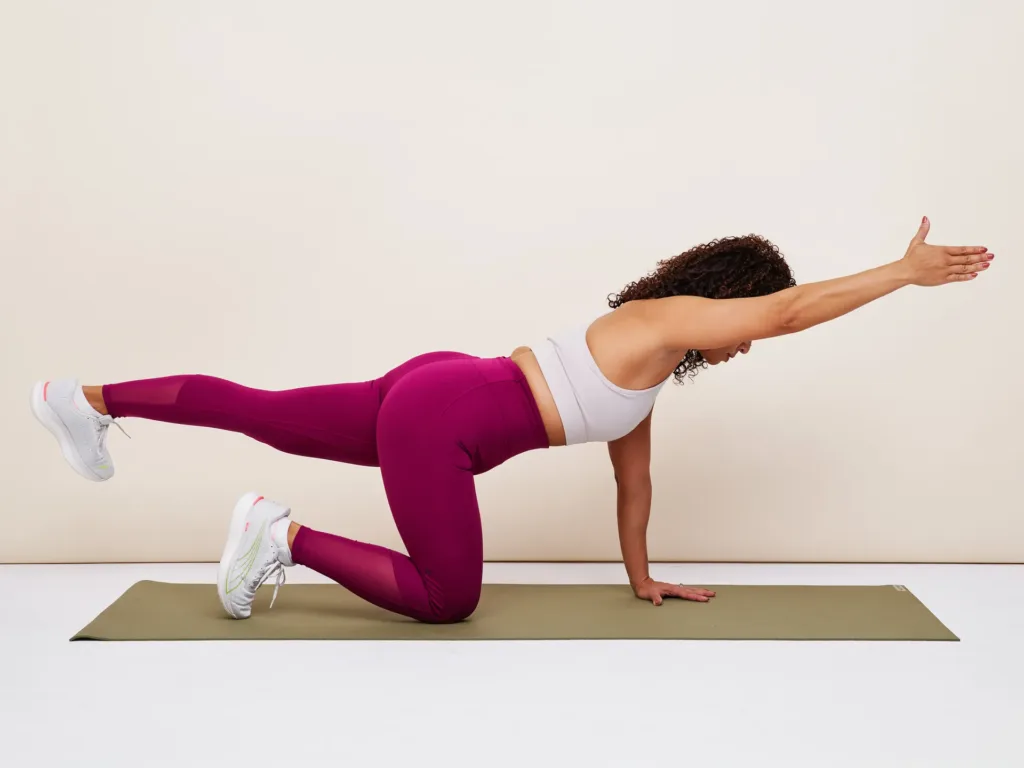
The Bird Dog exercise is a simple yet effective core-strengthening exercise that targets the muscles in your back, abdomen, and hips. Named for its resemblance to the posture of a bird dog pointing at its prey, this exercise is popular in fitness and rehabilitation programs for its ability to enhance stability and improve posture. Whether you’re an athlete looking to enhance your performance or someone recovering from a lower back injury, the Bird Dog exercise offers a range of benefits.
How to Perform the Bird Dog Exercise:
- Starting Position:
- Begin on your hands and knees in a tabletop position. Your hands should be directly under your shoulders, and your knees under your hips.
- Alignment:
- Ensure a neutral spine by keeping your head in line with your back. Engage your core muscles to stabilize your spine.
- Raising the Arm:
- Lift your right arm straight out in front of you, reaching it forward. Keep your arm parallel to the ground and your palm facing in.
- Extending the Leg:
- Simultaneously, extend your left leg straight back behind you. Your leg should be parallel to the ground, and your toes pointed.
- Hold and Balance:
- Hold the extended position for a few seconds, ensuring your hips remain level and your back stays straight. Focus on maintaining a strong and stable core.
- Return to Starting Position:
- Slowly bring your arm and leg back to the starting position, lowering them to the ground.
- Repeat on the Other Side:
- Repeat the exercise on the other side by extending your left arm and right leg.
Tips for Performing the Bird Dog Exercise:
- Controlled Movements: Avoid jerky or rapid movements. Focus on controlled and deliberate motions to maximize the effectiveness of the exercise.
- Breathing: Coordinate your breath with the movements. Inhale as you extend your arm and leg, and exhale as you return to the starting position.
- Maintain Stability: Keep your hips level throughout the exercise to engage your core and stabilize your spine.
- Repeat and Progress: Start with a few repetitions on each side and gradually increase as your strength and stability improve. You can also add variations, such as holding the extended position for a longer duration or incorporating resistance.
Benefits of the Bird Dog Exercise:
- Core Strength: Targets the muscles of the abdomen, lower back, and hips, promoting overall core strength.
- Balance and Stability: Enhances balance and stability by requiring coordination between the upper and lower body.
- Improved Posture: Strengthens the muscles responsible for maintaining a neutral spine, contributing to better posture.
- Reduced Lower Back Pain: Can be beneficial for individuals with lower back pain, as it focuses on strengthening the muscles that support the spine.
- Functional Movement: Mimics natural movement patterns, making it a functional exercise with applications in daily activities and sports.
3. Knee-to-chest stretch exercise

The knee-to-chest stretch is a fundamental exercise that can provide targeted relief for lower back pain and stiffness. This gentle stretch helps to release tension in the lower back muscles, increase flexibility, and promote better spinal alignment. Whether you’re dealing with occasional discomfort or chronic lower back issues, incorporating the knee-to-chest stretch into your routine can contribute to improved overall spinal health. In this article, we’ll explore the benefits of this exercise, how to perform it correctly, and who can benefit from including it in their fitness regimen.
How to Perform the Knee-to-Chest Stretch:
- Starting Position:
- Lie on your back on a comfortable surface, such as a yoga mat or carpet.
- Keep your legs extended and your arms by your sides.
- Execution:
- Bend your knees, bringing them toward your chest.
- Grasp your shins, just below the knee, with your hands. If you’re less flexible, you can also hold onto the back of your thighs.
- Gently pull your knees toward your chest until you feel a comfortable stretch in your lower back and buttocks.
- Hold and Breathe:
- Hold the stretch for 15-30 seconds, allowing your lower back to relax into the floor.
- Focus on deep, slow breaths to enhance the stretch and promote relaxation.
- Release:
- Slowly release your legs and return them to the starting position.
- Repeat the stretch 2-4 times, depending on your comfort level.
Benefits of the Knee-to-Chest Stretch:
- Lower Back Pain Relief: The primary focus of the knee-to-chest stretch is on the muscles of the lower back. By gently pulling your knees toward your chest, you can alleviate tightness and reduce pain in this area.
- Improved Flexibility: Regularly practicing this stretch can enhance the flexibility of the lower back and hips. Increased flexibility contributes to better range of motion and can help prevent stiffness.
- Stress Reduction: The rhythmic, controlled movements involved in the knee-to-chest stretch can have a calming effect on the nervous system. This not only aids in physical relaxation but can also help reduce overall stress levels.
Who Can Benefit from the Knee-to-Chest Stretch:
- Individuals with Lower Back Pain: Whether you’re experiencing acute or chronic lower back pain, this stretch can offer relief by gently stretching and releasing tension in the affected muscles.
- Office Workers: If you spend long hours sitting at a desk, the knee-to-chest stretch can counteract the negative effects of prolonged sitting, such as tight hip flexors and lower back discomfort.
- Athletes and Fitness Enthusiasts: Incorporating this stretch into your warm-up or cool-down routine can help enhance overall flexibility, reduce the risk of injury, and promote recovery after intense workouts.
4. Plank exercise
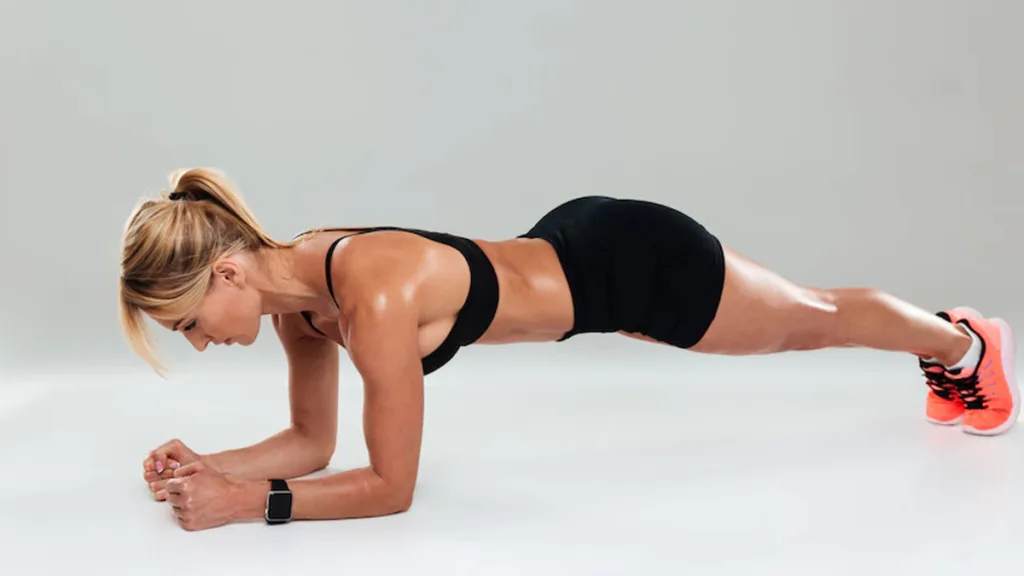
The plank exercise is a highly effective full-body workout that targets various muscle groups, including the core, shoulders, arms, and back. Here’s a detailed guide on how to perform the plank exercise correctly:
How to Do the Plank Exercise:-
Starting Position:
- Begin by positioning yourself face down on the floor. Place your forearms on the ground, ensuring that your elbows are directly beneath your shoulders.
- Your arms should be parallel to your body and about shoulder-width apart. Your palms can be flat on the floor or clasped together, depending on your preference.
- Extend your legs straight behind you, with your toes touching the ground. Your body should form a straight line from your head to your heels.
Proper Alignment:
- Engage your core muscles by pulling your belly button toward your spine. This action will help maintain a straight and stable body position throughout the exercise.
- Ensure that your hips are in line with your shoulders and knees. Avoid letting your hips sag or lifting them too high, as this can compromise the effectiveness of the exercise.
Head and Neck Position:
- Keep your head in a neutral position, aligning it with your spine. Avoid looking up or letting your head hang down.
- Gaze at the floor to maintain proper neck alignment, and focus on keeping a strong, stable core.
Breathing:
- Breathe naturally throughout the exercise. Avoid holding your breath, as consistent breathing helps engage your core muscles and promotes endurance.
Duration:
- Hold the plank position for as long as you can maintain proper form. Beginners may start with shorter durations (e.g., 20-30 seconds) and gradually increase the time as strength improves.
- Aim for at least 30 seconds to one minute for optimal benefits. Advanced practitioners may challenge themselves with longer durations.
Modifications:
- If you find the full plank challenging, you can modify the exercise by dropping to your knees while maintaining a straight line from your head to your knees.
- Another modification is to perform the plank with your hands on an elevated surface, such as a bench or step, to reduce the intensity.
Safety Tips:
- Listen to your body. If you experience pain or discomfort, especially in your lower back, adjust your form or take a break.
- Focus on quality over quantity. It’s better to maintain proper form for a shorter duration than to compromise your posture for a longer time.
5. Superman exercise
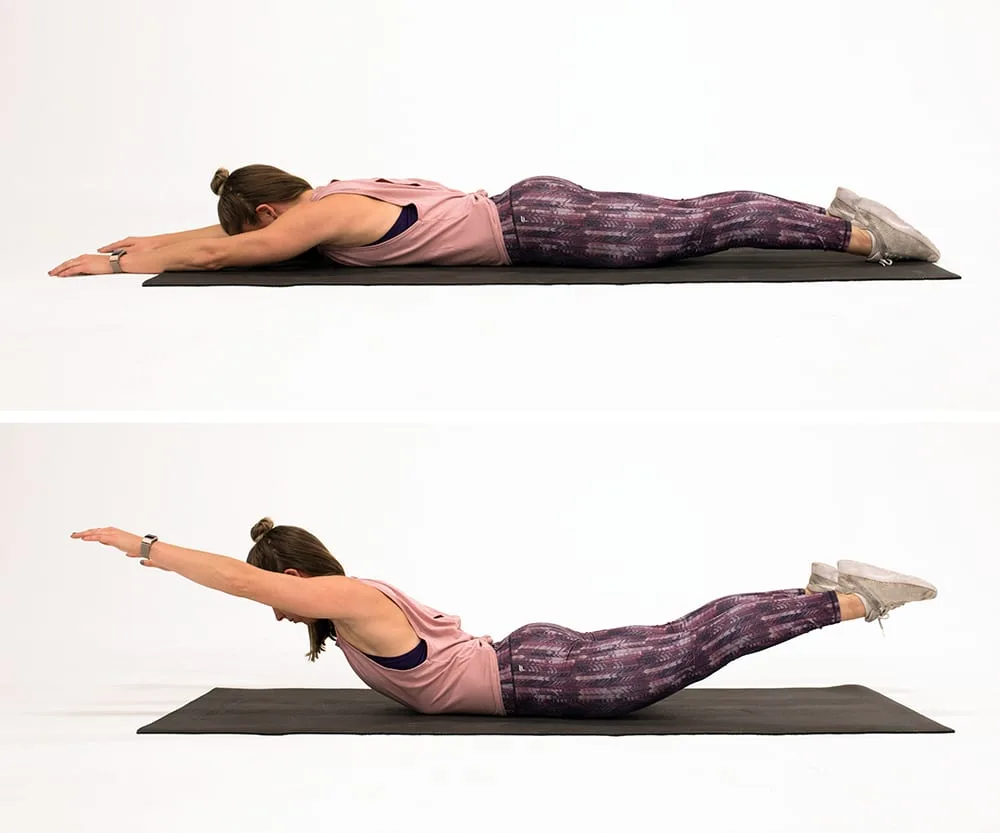
The Superman exercise is a popular and effective core-strengthening exercise that targets the muscles in the lower back, glutes, and shoulders. It’s named after the iconic flying posture of the superhero Superman, as the movement mimics the action of flying through the air. This exercise is not only beneficial for building core strength but also for improving posture and reducing the risk of lower back pain.
Here’s a step-by-step guide on how to perform the Superman exercise:
Muscles Targeted:
- Lower back (erector spinae)
- Glutes (buttocks)
- Shoulders (deltoids)
Instructions:
- Starting Position:
- Lie face down on a mat or another comfortable surface with your arms extended straight in front of you and your legs fully extended.
- Engage Your Core:
- Begin by engaging your core muscles. Imagine pulling your belly button towards your spine to activate the muscles in your abdominal region.
- Lift Your Arms and Legs:
- Simultaneously lift your arms, chest, and legs off the ground. Keep your gaze down to maintain a neutral spine and prevent straining your neck.
- Squeeze Your Glutes:
- As you lift your legs, focus on squeezing your glutes. This action helps stabilize your lower back and engages the muscles in your buttocks.
- Hold for a Moment:
- Hold the lifted position for a moment, ensuring that you maintain a straight line from your fingertips to your toes. Avoid arching your back excessively.
- Lower Back Down:
- Gently lower your arms, chest, and legs back to the starting position. Take a moment to relax before repeating the exercise.
- Repeat:
- Perform the Superman exercise for a designated number of repetitions or hold the lifted position for a specific duration, depending on your fitness level.
Tips:
- Focus on the quality of the movement rather than the quantity of repetitions.
- Keep your movements controlled and avoid using momentum.
- Breathe steadily throughout the exercise, exhaling as you lift and inhaling as you lower.
Variations:
- Superman with Alternating Arm and Leg Lifts:
- Lift your right arm and left leg simultaneously, then switch to the left arm and right leg. This variation adds an element of coordination and challenges your balance.
- Superman Plank:
- Begin in a plank position and lift one arm and the opposite leg simultaneously, then switch sides. This variation integrates the Superman movement into a plank for an extra challenge.
Conclusion:
Incorporating these physiotherapy exercises into a comprehensive treatment plan can significantly contribute to the management and improvement of Baastrup’s Disease symptoms. However, it’s crucial to consult with a healthcare professional or physiotherapist before starting any exercise regimen, as individual needs may vary. Consistency, proper form, and patience are key when embarking on a physiotherapy journey for Baastrup’s Disease, ultimately paving the way for a healthier, pain-free spine.

